
Let me give you a scenario: It’s your first week of learning coding. You’ve watched the required YouTube tutorials and are eager to try out the code shown in the videos. You open your Notepad to write your first Python program and… wait. Is this the programmer’s playground? Is this the place to write your code? In Notepad?
The answer is a simple NO. This rejection brings us to today’s step-by-step guide on setting up your own playground to work with the code as you wish. And that said, the playground is Visual Studio Code – or VS Code as everyone knows it. This code editor is used by over 73% of developers worldwide. It was built by Microsoft, and the best part is it’s completely free.
In this guide, I’m going to walk you through how to set up VS Code as a beginner in Windows from scratch. There will be no assumptions, no skipped steps, just a step-by-step guide on how to set up VS Code. By the end of this post, you’ll have your playground fully prepared for your first program.
What Is VS Code and Why Should Beginners Use It?
Before I dive into the actual VS Code setup, I want to spend a couple of minutes explaining what this thing is — when I first heard the word “code editor,” I was like, that’s some super complicated developer tool that I’m not smart enough to use yet. Spoiler: it’s not.
VS Code is as easy to describe as saying that it’s like Microsoft Word, but instead of typing an essay, you are typing code. Your word highlights spelling errors in red right? Your coding errors will be highlighted in red in VS Code. Word has formatting tools to make your document look clean? VS Code provides tools to keep your code clean and readable.
When you have Word, you will never write your college assignment in Notepad — Similarly, never write code in Notepad when you have VS Code.
You might ask yourself, “Why should I use VS Code, and why should it be my first editor of all the code editors available? Frankly, I was instantly sold on it for a variety of reasons:
- No cost required. No gated “basic plan” and no 14-day time-out for free trial. Just free — forever.
- It will not cause your laptop to shed tears. Compared to some heavier tools I have used (Eclipse), VS Code opens in seconds and is high-performing even on budget laptops.
- Speaks all languages. No more having to install another editor for each new language — VS Code gets you all of that.
Extensions really make it “stupidly powerful”. Extensions are just like apps you install within VS Code, adding superpowers to it! I’ll come to these later, and they are not as technical as they sound.
It’s really a tool that developers use. I’ve noticed job posts stating “experience with VS Code preferred”. It is better to do this now, rather than later.
OK, enough with that cajoling! Let’s get into the actual setup.
Step 1 – Download VS Code
First things first — we need to download the installer.
Go to code.visualstudio.com in your browser (can be Chrome, Edge, Firefox, whatever).
You’ll end up on the official VS Code website. The large blue “Download for Windows” button will be staring at you. Click it.
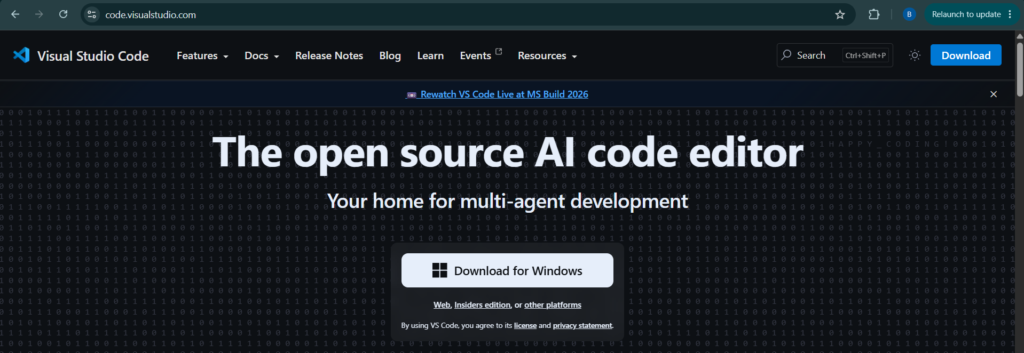
This will download a file into your Downloads folder, such as VSCodeSetup-x64-1.xx.x.exe. This is about 90MB, so should only take a minute or so on a good connection.
Important: Always download from the official site of VS Code – code.visualstudio.com. Do not download it from any untrusted third-party websites. It’s free from Microsoft; why look elsewhere?
Step 2 – Run the Installer
After the download is complete, you will find the install file in your Downloads folder; double-click the install file.
Windows may display a security warning: Do you want to allow this app to make changes to your device? Click Yes. It’s Microsoft’s software, and it is safe.
The VS Code Setup Wizard will appear. Here are the steps for each screen:
Screen 1 — License Agreement screen: Click on I accept the agreement, and then click Next.
Screen 2 — Destination location: Leave it as the default and click Next.
Screen 3 — Click on Start Menu Folder and leave it so, then click Next.
Screen 4 – Select Additional Tasks ← This is important!
There are multiple checkboxes in this screen. What to put in the tick box:
☑️ Add “Open with Code” action to Windows Explorer file context menu— This enables you to right-click any file and open it in VS Code. Very useful.
☑️ Add “Open with Code” action to Windows Explorer folder context menu — Same but for folders.
☑️ Select Register Code as an editor for supported file types — Set VS Code as the default editor for code files.
☑️ The important one is Add to PATH. It allows code to be used to open VS Code from the terminal. Always tick this.
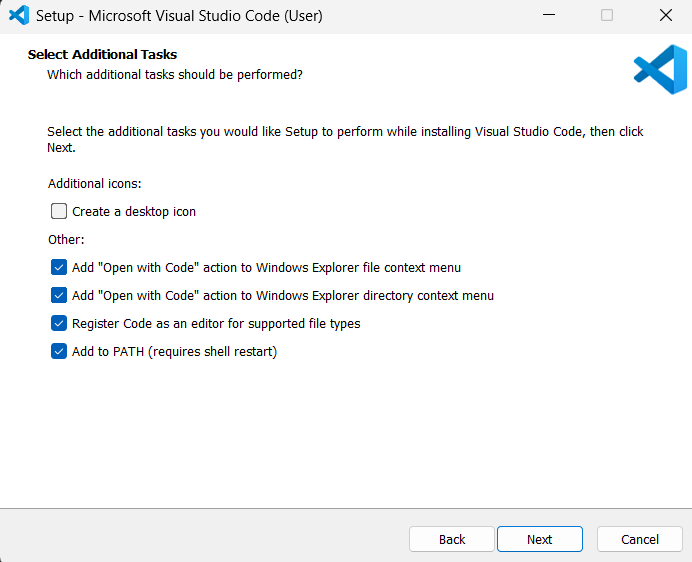
Screen 5: Ready to Install: Click Install, and wait. This takes about 30-60 seconds.
Screen 6: Check off “Launch Visual Studio Code” and click on the Finish button.
VS Code will be launched for the first time. Congratulations on your new home as a programmer.
Step 3 — Get Familiar With the VS Code Interface
The first time you open VS Code, there will be a Welcome tab at the top, some links, and a dark interface. Do not be alarmed; it seems more threatening than it actually is.
A quick overview of the VS Code interface:
Activity Bar (left side) — The icons along the left side. These icons will alternate between each of these panels:
📁 Explorer — where you will find your files and folders
🔍 Search — Search for text in any of your files.
🔀 Source Control — for Git (for now, don’t be concerned with this)
🐛 Run and Debug — to test your code
🧩 Extensions — to install extensions
Editor Area (centre) — This is where you write code and spend the majority of your time.
Status Bar (bottom) — The small bar at the bottom, providing information such as the language you are using and any errors.
Terminal (bottom panel) — A built-in terminal to run your code without leaving VS Code. This is one of the best features of VS Code.
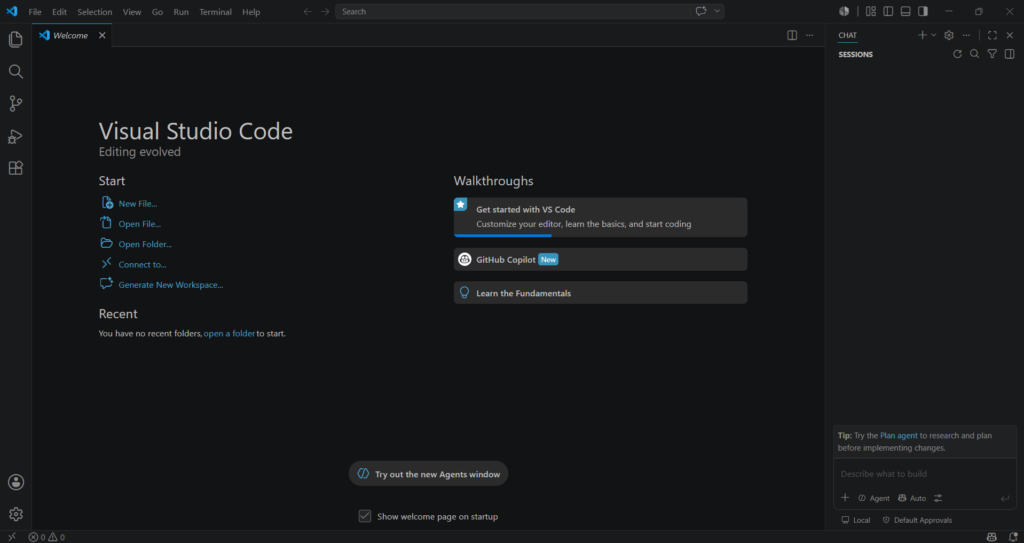
Give yourself 5 minutes to familiarize yourself with the site. Need not know it all; just know where things are!
Step 4 — Install the Python Extension
VS Code is a text editor by itself. Extensions: These are installed and they add language support, tools, and features; the magic occurs here.
Most novice programmers begin with Python, so it is advisable to install the Python extension first.
In the Activity Bar, click on the Extensions icon (which is a collection of four squares, one of which is a bit off-center). Or use Ctrl + Shift + X.
In the search box at the top of the Extensions panel, type “Python”.
The first one will be “Python” by Microsoft; more than 100 million downloads. Click Install.
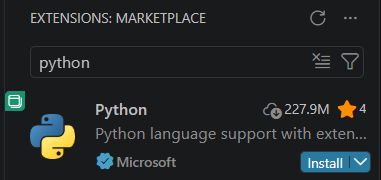
Wait a minute or so for it to install.
That’s it! VS Code now fully supports Python: Syntax highlighting, error detection, autofill, and even being able to run Python files directly from VS Code.
Step 5 — Install Python on Your Computer
Wait — VS Code is a code editor, but it doesn’t actually come with Python. You need to install Python separately on your Windows computer.
Think of it this way: VS Code is like Microsoft Word, and Python is like the English language. Word can help you write in English, but you still need to actually know English.
Here’s how to install Python on Windows:
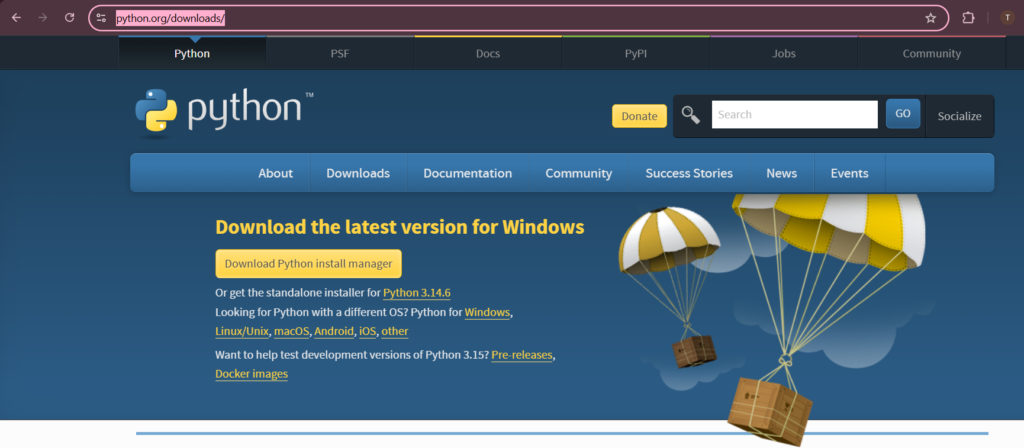
Go to python.org/downloads
Click the big yellow “Download Python 3.xx.x” button (whatever the latest version is).
Run the installer. On the first screen — very important — tick the box that says “Add Python to PATH” before clicking Install Now.
Wait for the installation to complete.
To check if Python installed correctly, open VS Code, press Ctrl + ` (backtick key, next to the 1 key) to open the Terminal, and type:
python –version
If it shows something like Python 3.12.4 — you’re good. Python is installed and VS Code can find it.
Step 6 — Write and Run Your First Program in VS Code
This is the fun part. Now, let’s start our first Python program in VS Code.
Make a new project folder:
- On Windows, open the File Explorer.
- Make a new folder somewhere that’s easily accessible — such as C:\Users\YourName\coding-projects
- Name it something simple, such as “my-first-project”.
Open this folder in VS Code:
- File -> Open Folder in VS Code.
- Click on the Select Folder button in your new folder.
Create a new file:
- In the Explorer pane, on the left side, click the New File icon (plus sign on a page)
- Now name it hello.py (the .py extension indicates that it is a Python program to VS Code).
Create your first program:
- Click on the editor area and enter:
print(“Hello, World!”)
print(“I just configured VS Code. I’m now a programmer in essence.”)
Run your program:
- Right-click anywhere in the editor
- Click the ‘Run Python File in Terminal’ button
- OR press Ctrl + F5
The Terminal will appear at the bottom, and you will see your output:
Hello, World!
I’m now a programmer in essence.
Congratulations. You just wrote and developed your first program in VS Code. That feeling? Remember it.
Step 7 — Install These 3 More Extensions
You’re now ready to install some more useful extensions, which every Python beginner should have:
- Install Prettier — Code Formatter. Prettier automatically formats your code to be neat and tidy. It’s a bit like a grammar checker for your code.
- Search for “GitLens” and install it. When you start using GitHub – and you should, and we have a full guide on using GitHub – it will show you who changed what line of code and when, once you do that. Very useful.
- Install Indent-rainbow. This highlights different levels of indents with different colors, which helps a lot to read Python code, which is heavily based on indents. A true beginner’s favourite extension.
Step 8 — Change the Theme (Optional but Fun)
Did someone mention that you can totally customize the appearance of VS Code? The dark theme is good, but there are thousands of beautiful themes.
To change your theme:
- To open the Command Palette: Ctrl + Shift + P
- Enter the word “Color Theme” and hit Enter
- Look through the pre-built themes — click the ones to see them in action
My suggestion for newbies: “One Dark Pro” — it is clean and easy on the eyes and just sports the classic programmer aesthetic. Go to Extensions, search for “One Dark Pro” and install.
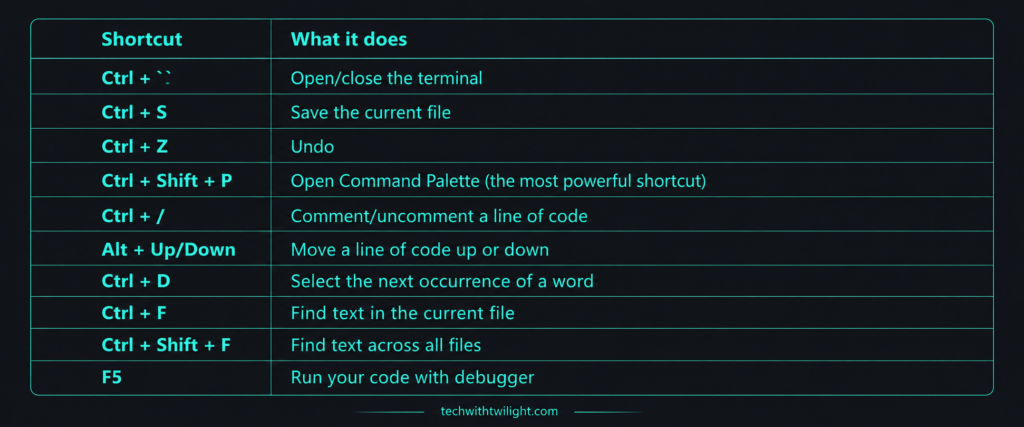
Useful VS Code Keyboard Shortcuts for Beginners
Learning these shortcuts will save you hours:
| Shortcut | What it does |
| Ctrl + ` | Open/close the terminal |
| Ctrl + S | Save the current file |
| Ctrl + Z | Undo |
| Ctrl + Shift + P | Open Command Palette (the most powerful shortcut) |
| Ctrl + / | Comment/uncomment a line of code |
| Alt + Up/Down | Move a line of code up or down |
| Ctrl + D | Select the next occurrence of a word |
| Ctrl + F | Find text in the current file |
| Ctrl + Shift + F | Find text across all files |
| F5 | Run your code with debugger |
You don’t need to memorise all of these right now. Just save this page and come back to it when you need a specific shortcut.
Troubleshooting Common VS Code Issues for Beginners
“Python is not recognised as a command.” This means Python wasn’t added to PATH during installation. Uninstall Python and reinstall it — making sure to tick “Add Python to PATH” on the first screen.
VS Code is running slowly. Try disabling extensions you don’t use. Go to Extensions, click the three dots, and select “Disable All Installed Extensions” — then re-enable only the ones you need.
Code isn’t running when I press Ctrl + F5. Make sure you have the Python extension installed AND that Python is installed on your system. Check by opening the Terminal (Ctrl + ) and typing python –version`.
The terminal isn’t showing in VS Code. Go to View → Terminal or press Ctrl + ` (backtick). If it still doesn’t appear, restart VS Code.
Final Thoughts
You’ve just set up VS Code, which is one of the first steps towards becoming a programmer. In less than 30 minutes you have progressed from “I write code in Notepad” to a proper and professional development environment!
This is what you now have:
- VS Code installed and configured on Windows ✅
- Python was installed and linked to VS Code ✅
- Essential extensions installed ✅
- Your first program written and running ✅
The next step? Keep coding. Use VS Code each day – write something – even if it is something small. The editor is a tool! It’s what you make of it.
If you have not read our guide of the best free websites to learn coding, then read that next — you will find out where you can practice your newly set up editor.
Had a smooth VS Code setup for you? Or have you had any problems? Leave a note below – I respond to all comments and love helping you with any issues!
Related posts you might like: